
I have no idea why I could not get this into the previous blog entry - - the graphics part of the Blogspot system just seemed to freeze up and would not let me enter any more photos.
One of life's little mysteries, I suppose.

One of the many benefits derived from building your own electronic circuits is that you can , within certain limits, build them to satisfy your particular needs.
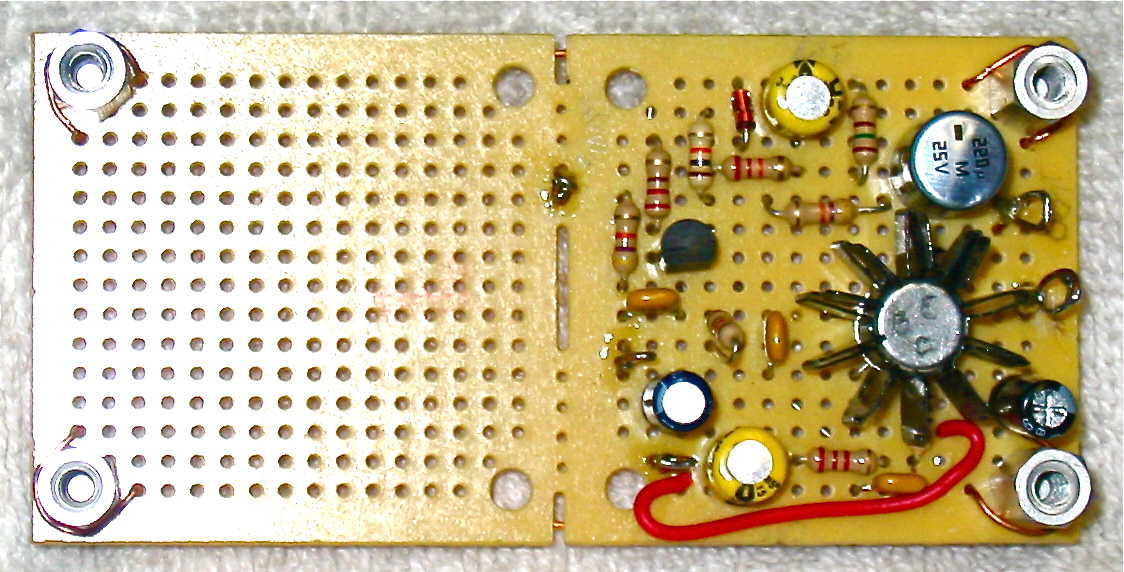
Worthy of note in both the above photos is the Ground Buss wire, which you can see looping around the standoffs at each coiner of the boards. The ground buss runs around the entire circuit board on the solder side of the board - - you can also see tiny bits of it where the wire crosses the perforations in the middle of board.
The version of the WT40 Audio Amplifier using BOTH HALVES of the dual circuit board for the Audio Amplifier is the one that will be detailed in Part 5: Building the Audio Amplifier.
When things quit working as I was trying to enter the previous posting of Part 4, I was about to post the Flow Chart of the Receiver Section, showing where the Audio Amplifier fits into the the Receiver section of the WT40 Transceiver, so here it is . . .

Not surprisingly, the Audio Amplifier is the last module in the string before the signal goes into the earphones, then into your ear.
Notice that there is an Optional Audio Filter included in the drawing, along with an optional connection for a speaker. Details for the filter and speaker connection will be presented when we get to Optional Features.
Meanwhile . . .
The FIRST STEP in building a module is to GATHER all the PARTS.
RULE OF THUMB: Never, ever, start building a module until all the parts are on hand.
PARTS LIST for the Audio Amplifier Module
The Parts List shown below contains only the parts required for the Audio Amplifier Module.
Resistors
1/4 Watt, plus or minus 5% tolerance.
Values shown in Ohms; k = x 1000.
[] One: 10
[] One; 150
[] One: 220
[] One: 1k
[] One: 2.2k
[] One: 4.7k
[] One: 10k
[] One: 22k
[] Two: 47k
NOTE: Quarter Watt resistors can be purchased for a penny each, or less, from parts suppliers such as JAMECO and MOUSER, - BUT - to get such a good price, they must be purchased in lots of 100, or more pieces. For small projects, such as the WT40 Transceiver, it is probably less expensive to pay the "extra" few cents to purchase them in smaller quantities.
Audio Gain Control
Plus or minus 20% tolerance, 1/4 Watt, Audio Taper Potentiometer (logarithmic).
[] One: 10k, JAMECO # 255426, or equivalent.
NOTE: The Audio Gain potentiometer mounts on the Control Panel, NOT on the circuit board, but you might as well add it to your parts collection now because you will need it during check-out of the Audio Module.
Another NOTE: You may be wondering . . . What about a knob for the potentiometer? That's a good question. Actually, no knob is needed at this point in the game because the shaft is easily turned without a knob. Knobs and switches will be detailed when we get to the Front Panel, much later in this series. You can, of course, get a knob now - just be sure it will fit the shaft on the potentiometer you choose for Audio Gain control (the shafts come in different diameters, and some are slotted or half-moon shaped).
Capacitors:
Plus or minus 20% tolerance, Monolithic Ceramic, Type Z5U, or equivalent.
[] Three: 0.1 uF
Polarized, Electrolytic Capacitors
Plus or minus 20% tolerance, Radial -Lead, rated for 16 volts or more.
[] Three: 10uF
[] One: 47 uF
[] One: 220 uF
NOTE: Polarized electrolytic capacitors of a given capacitive and voltage rating come in different physical sizes. I suggest you obtain the smallest size available from your parts supplier (Excluding surface - mount capacitors, which is story for another day).
Miscellaneous Parts
[] One: Radio Shack #276-148 Dual Circuit Board, or equivalent .
NOTE: The "Front End" of the receiver (Filter, RF Amplifier, Mixer, and Audio Buffer) will require three or four more circuit boards. I say "three or four" because I have not yet decided exactly how to package the circuits. You will need a minimum of three, and a maximum of four for the receiver section of the transceiver.
Another NOTE: I have found that not all Radio Shack stores stock these circuit boards, so it would be good to call before going to the store.
[] Mounting Hardware for the circuit board. The exact hardware for mounting the modules will depend upon how the builder (YOU) decide to package your transceiver. At this point in the building process, the main purpose for the standoffs is to provide an Anchor at each corner of the circuit board for the Ground Buss. The standoffs listed here will be useful during final assembly of the transceiver, no matter what packaging procedure is used.
[] Four: 1/4 inch, Hex 6-32 threaded, male/Female standoff, 1/4 inch long, JAMECO #133542, or equivalent.
[] Four: 3/4 inch, Hex 6-32 threaded, Female/Female standoff, 5/8 inch long JAMECO #77623, or equivalent.
[] One: Heat Sink for the 2N3053 transistor, MOUSER part number 532-323005800, or equivalent. Most any heat sink for a TO39 transistor will do the trick. "TO39" simply means "Transistor Outline number 39", referring to a line drawing that shows the outline of the transistor. The 2N3904 transistor used for the preamplifier is a TO92, and needs NO heat sink.
You can fashion a heat sink using #20 or #22 bare copper wire that is adequate for this application, as shown in the photo, below.

A wire heat sink requires the transistor to have a metal case so the heat sink can be soldered to the case.
Making a heat sink this way is a rather labor intensive task, and requires a bit of practice to get the wire shaped "just right", so it is not a job to be taken lightly.
Well, enough of that, back to the parts list . . .
[] About 19 inches: #22 bare copper wire for the Ground Buss and Tie Points. (And another six inches, or so, if you plan to make your own heat sink.)
NOTE: You will use several feet of #22 bare copper wire for Ground Buss and Tie Points if you build all the modules in this transceiver following the procedure outlined here. Bare copper wire can usually be purchased for less money at a hardware store than at an electronics parts store.
[] About 6 inches: #24 or #26 Stranded Hook-Up Wire for Jumpers.
Speaking of Jumpers, if you don't already have them, it would be a good idea to get set of test / jumper cable, Radio Shack # 278-1156, or equivalent.
[] About a foot, or so, of 3-wire hook up cable (sometimes called "intercom cable") to connect the Audio Gain potentiometer to the Audio Amplifier module during testing. I use salvaged, multi-color ribbon cable for this sort of thing because wire of any kind is usually sold by the pound and/or in spools of 100 ft or more, which is a lot of wire, and it would take a couple of lifetimes to use up a 100 ft spool of of #24 or #26 hook-up wire (unless you plan to do an awful lot of wiring). You may be able to buy wire by the foot at your local electronic parts outlet, and some Radio Shack stores still stock wire to sell by the foot - - ask for the 3-conductor intercom wire, #278-871.
This intercom wire cable may (or may not) be available at your friendly, neighborhood Radio shack store. There are several Radio Shack stores in the area where I live, and I have found that some stores carry a larger variety of items than others.
NOTE: 3-wire intercom cable, or equivalent, will also be need for testing of the Product Detector and VFO modules. This cable comes in handy for all sorts of things at the workbench, so you might as well stock a few "extra" feet for future use.
THE AUDIO AMPLIFIER CIRCUIT
A schematic diagram of the audio amplifier circuit is shown below, along with a drawing of a suggested layout.

This audio amplifier circuit has been published in several editions of the ARRL handbook, and is intended primarily for use with headphones.
A few things worthy of note in the Schematic Diagram and the Layout Drawing. . .
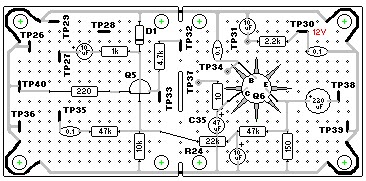
[] The Schematic is intended to represent the Electronic Circuit, not he physical layout, which is the job of the Layout Drawing. The schematic is more "absolute" than the layout drawing, which is more of a suggestion.
[] The LABELING and NUMBERING of COMPONENTS is somewhat arbitrary, but not random. TP27, TP28, TP29, etc. represent Tie Points, which can also serve as Test Points.
[] Some of the Tie Points, such as TP31, are represented by GRAY circles, and are different from other tie points in that they are simply perforations in the circuit board where hook-up wire is inserted so it can be soldered to a component on the solder side of the board. These tie points are used (mostly) the ends of Jumper Wires.
[] The Tie Points represented by a dark black line between two perforations, such as TP40 (a Tie Point for Ground) and TP35 (a Tie Point for the Sidetone Signal) are fabricated using #22 bare copper wire. A detailed description of how to make these tie points will be included in Part 5: Building the Audio Amplifier.
NOTE: The symbols I am using for Tie Points are NOT industry standard symbols - they are a way to help me keep track of what's going on n the circuits, and I hope they are also helpful for you.
[] Components other that Tie Points are also numbered sequentially, such as R22, R23, and R24, which represent RESISTORS. There are two types of resistors represented in this Schematic:
[] R17, which is a variable resistor (potentiometer) used as a Volume control, which has Three connecting points, TP26, TP27, and TP28.
[] All other resistors, which are Fixed Value resistors, have Two connecting points, one on each end.
NOTE: R17 is NOT mounted on the Audio Amplifier circuit board - it will be mounted on the Control Panel of the transceiver, and connected to the circuit board with hook-up wire. I have included R17 in the Audio Amplifier schematic because it is an important part of the circuit, and helps show, exactly, where the signal entering the Audio Amplifier at TP27 comes from.
[] There are Two types of CAPACITORS used in the Audio Amplifier module:
[] C29, C31, C34, C35, and C36 are Polarized Electrolytic Capacitors - easily recognized because of the "+" designation on the positive end of the capacitor, and a (slightly) different symbol than . . .
[] All other capacitors, which are much smaller, non-electrolytic Ceramic Capacitors.
[] There are Two types of TRANSISTORS:
[] Q5, a 2N3904, small signal transistor that serves as the PREAMPLIFIER to boost the signal to a suitable level to be amplifier by . . .
[] Q6, a 2N3053, which can handle more power than the 2N3904, and power a set of Headphones.
NOTE: Both the 2N3904 and the 2N3052 are bipolar, NPN type transistors.
[] The Diode, D1, a 1N4148, helps stabilize the preamplifier.
If you what or need more details about Symbology, Terminology, and Definitions regarding Schematic Diagrams, the ARRL Handbook is an excellent reference.
Alert readers, such as yourself, will have noticed that the items enumerated in the Audio Amplifier, C29, C30, C31, etc. begin with two digit numbers as opposed to 1, 2, 3, etc. This is because I have numbered the components in the entire Receiver Section, including the Receiver Filter, RF Amplifier, Mixer, Audio Buffer, and Audio Amplifier to follow the signal flow through the modules from antenna input through the Audio Amplifier.
I was planning to include a Schematic Diagram of the entire Receiver section of the Transceiver at the beginning of Part 5, but since Part 4 has been split into two entries into this blog, I might as well include it here, for your reference.

CAVEAT: I'm still working on some minor changes in the modules preceding the Audio Amplifier, so the enumeration of items may be slightly different than shown here but the time I post Part 5 here on this blog.
Be that as it may, I will keep readers of this blog informed as to what is going on.
Component numbering for the VFO, the Transmitter section, and Optional Features will have their own component numbering scheme, each beginning with 1, 2, 3, 3 etc.
Come ti think of it - - I may go to a fresh numbering for each module because it is time consuming and boring when I have to go through the whole schematic and layout drawing to re-number the components. Hmmm m m . . . I'll have to think about that, some more.
No, I do not use a schematic generating application program to draw the schematics and layouts you see here - I do it all with the keyboard and mouse, one component at a time to create a bitmap file using Paintbrush, then convert the graphics to PNG format for posting. Google Blogspot probably converts the graphics to
OK, that finishes Part 4.
Collect the parts for the Audio Amplifier module in preparation for Part 5: BUILDING the AUDIO AMPLIFIER where we will actually power up the soldering iron and do a bit of soldering.
Speaking of soldering . . . if you are new to this game of building electronic circuits, I recommend reading the Circuit Construction chapter in the ARRL Handbook. Yes, the whole chapter, paying particular attention to the sections about assembling components onto circuit boards and soldering.
One way to gain some experience with soldering techniques is to fabricate several small copper wire rings, about half an inch, or so, in diameter. I think such an exercise will prove to be worthwhile when you start preparing and populating the circuit board in Part 5.
END of Part 4: AUDIO AMPLIFIER MODULE, an INTRODUCTION
No comments:
Post a Comment