
WT40 Part 5: BUILDING the AUDIO AMPLIFIER MODULE
There have been some minor updates to the Schematics and Layout Drawings shown in previous posts to this blog.
Revised drawings are shown below.

For the benefit of inexperienced builders, much detail will be presented for building the Audio Amplifier Module because this is the first module in to be built in this series. It is not my intention to insult anyone's intelligence by dwelling on boring details, and I think it is equally important to present enough information so that nobody gets lost in the process.
Subsequent modules will omit some of the detail.
For the subject at hand, which is building the Audio Amplifier module, an updated Schematic for the Audio Amplifier Module, which includes both Preamplifier and Amplifier circuits, is shown below.

Incoming signals will be carried by a twisted pair (or by miniature coaxial cable, such as RG174 or equivalent, if you prefer). Notice on the Schematic Drawing that signal points, such as the one for Audio In, require TWO Tie Points: one for the signal (TP27) and a companion Ground connection labeled (TP26, or other Ground Tie Point of your choice).
The Layout Drawing shown below is one of many that work equally well.

The layout drawing shows TOP views of components in black. The gray lines show the connections on the Solder Side of the circuit board - (sort of) an "X-Ray" view.
Notice, in the upper lefthand corner of the Layout Drawing, the Tie Points for the Incoming Audio Signal, TP27, and it's companion Tie Point for Ground, TP26.
In the Schematic Drawing, notice that TP27 connects to the Wiper of the Audio Gain potentiometer, R17, which will be mounted on the control panel for the transceiver. The Grounded end of R17 connects to TP26, which connects directly to the Ground Buss. The other end of R17 connects to TP28, which will also have a second wire carrying the Audio Signal connected from either the Product Detector or the (optional) audio Filter.
This means that TP28 is the audio signal from the Product Detector module enters the Audio Amplifier module - - even though there is no connection shown on the Layout Drawing.
Now, let's take a look at a . . .
PROCEDURE FOR BUILDING the AUDIO AMPLIFIER MODULE
[Applies to all modules.)
The procedure shown here assumes that the Radio Shack #276-148 Dual Printed Circuit Board, or equivalent, is being used as the platform on which the modules will be built.
A 5-STEP BUILDING PROCEDURE:
[1] Collect all parts required for the module.
[2] Prepare the circuit board.
[3] Populate the circuit board.
[4] Perform initial check-out of the circuit board:
[] Visual Check
[] Resistance Measurements
[] Current Measurements
[] Voltage Measurements
[5] Operational Test
Here in Part 5, we will complete items [1], [2], and [3] in the procedure, then perform Visual Check-Out and Resistance Measurements.
Current and Voltage Measurements and a preliminary Operational Test will be done in Part 6. The final operational test will be done after all the receiver modules have been completed and assembled.
NOTE: Jumper Wires will be soldered in place during Measurements in Part 6.
A final Operational Test wil be done after all the receiver modules have been completed and assembled.
I recommend you have all parts on hand, as suggested in Part 4, before starting to . . .
PREPARE THE CIRCUIT BOARD
FIRST, Mount Standoffs at each corner of the Radio Shack #276-148 Dual Circuit Board, or equivalent.

At this point in the process the standoffs will be serving as anchors at each corner for mounting the Ground Buss, which you can see looping around the standoffs in the photo, above. The recommended standoffs are:
[] 1/4 inch long Hex 6-32 Threaded Male / Female standoffs, JAMECO #133542, or equivalent, on the Solder Side of the circuit board.
[] 5/8 inch long Hex 6-32 Threaded Female / Female standoffs, JAMECO #77552, or equivalent, on the Component Side of the circuit board.
Much later in the building process, when the circuit boards are mounted in their final configuration, the standoffs can be easily removed and replaced with different length standoffs, if required to accommodate the needs of the configuration.
ADDING THE GROUND BUSS
When the standoffs are in place, ADD THE GROUND BUSS, using about 11 1/2 inches of #22 bare copper wire.

As you can see in the photo, the Ground buss loops around the entire circuit board.
At each corner, the Ground Buss passes through a perforation, goes around the standoff, then passes through another perforation back to the solder side of the board, then continues around the entire board, looping around the standoff at each corner.
Where the two ends of the Ground Buss meet, there should be about 3/8 inch overlap where the two ends are soldered together.

TIE POINTS
Each circuit board will have several TIE POINTS. These are labeled TPx in the layout drawing, shone below. The number "x" is for identification.

NOTICE that the circuit board is oriented with the "short" side containing 213 perforations to the left.
Tie points serve three functions:
[] Connecting points between modules
[] Test points for module check-out
[] Terminus for jumpers within a circuit board. TPs for jumpers are, sometimes, simply a perforation in the circuit board through which a wire is passed and soldered to a component.
Tie points are shown on Layout Drawing in two forms:
[1] Bold black lines between two adjacent perforations . . .

[2] Gray circles around a single perforation . . .

The bold black lines between two adjacent perforations in the Layout Drawing represent a loop of #22 bare copper wire that has been fashioned into a Tie Point, as illustrated below.

A wire loop type Tie Point requires about 2 inches of #22 bare copper wire folding it into a "u" shape so it can be inserted into two adjacent perforations.
NOTE: It is important that the bare copper wire is free of corrosion so that the solder adheres tightly to the wire. If there is any discoloration to the wire, clean it with very fine sandpaper, steel wool, or other fine-grained abrasive material.
Twist the wire on both the component side and the solder side, as illustrated in the drawing, above.
Form the wire to make a "U". I find it best to form the "U" before cutting the Tie Point from the end of the wire.

Cut the wire to get a long, skinny, upside-down "U".

Insert the "U" into two adjacent perforations, then twist the wire on both sides of the circuit board.
The photo, below, shows a newly formed "U" that has been inserted into the circuit board to become a Tie Point for connecting to Ground, such as TP39 on the Audio Amplifier module.

Tie Points that are Ground Connections, such as TP39, are placed in the perforations nearest to an edge of the circuit board, as shown above.
A couple of twists on both sides of the circuit board will secure the Tie Point.

The photo below shows a Ground Tie Point soldered to the ground buss.
Allow about 30 seconds, or so, for at the solder to cool, then solder the Tie Point on the component side of the circuit board. Notice, in the photo below, that the loop portion of the Tie Point is tinned with solder.

Tie Points that are NOT connected to ground, such as TP38, are placed so there is one or more perforations between them and the ground buss.
POPULATING THE CIRCUIT BOARD
The order in which the components are placed on the circuit board is a matter of personal preference. I started by placing the 2N3053 and its attached Heat Sink onto the circuit board, then added the components and tie points (installing JUMPERS will be discussed, later).
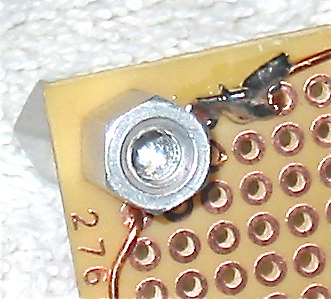
PREPARING THE 2N3053 TRANSISTOR
The 2N3053 is an NPN Bipolar transistor housed in a TO39 metal case with three "legs" that allow connection to the Emitter, Base, and Collector; left to right in the photo, below.

The "legs" on the 2N3053 are formed before being inserted into perforations on the circuit board, as shown below, with the Emitter, Base, and Collector identified.
Notice, in the photo below, that the Collector leg is connected directly to the case that houses the transistor.

This is IMPORTANT because it means that voltage is present on the case when voltage is applied to the circuit, and the case and the heat sink must not touch any other component on the board.
Form the legs so that the 2N3053 will stand about 3/16 inch above the circuit board.
When the legs are formed properly, attach the Heat Sink before inserting the transistor into the circuit board so that the legs will stand about 3/16 inch above the circuit board, as shown in the photo, below.

The Layout Drawing below shows the position of the perforation where the Emitter leg of Q6 is inserted through the circuit board.

The leg from the Emitter is inserted into the perforation located 8 perforations from the right end of the board and 7 perforations up from the bottom.
Shown below is a top view of the 2N3053 mounted on the circuit board - - with the Heat Sink Removed - - to indicate where the legs pass through to the Solder Side of the circuit board. The Base leg is soldered to the jumper wire coming from the Collector of Q5. This solder joint is designated TP34 on the Schematic and Layout Drawings.

This photo was taken after one end of Jumper 6 (the blue wire) had been soldered in place at TP34.
Components can be added to the circuit board in any order you wish. I recommend installing and soldering C36 from the Emitter of Q6 to TP38 next in order to hold Q6 firmly in place.
Be sure to orient C36 with the POSITIVE side connected to the Emitter of Q6.
NOTE: Not all electrolytic capacitors are polarized, but the ones use in the Audio Amplifier module ARE POLARIZED. It seems a bit strange that the positive connection of a polarized capacitor is indicated on schematic drawings while the negative connection is indicated on the body of the capacitor. - - Just one of the strange little quirks of "standardized" notation used in electronics.
On the Solder Side of the circuit board, the leads from components are formed firmly against the board with about 3/16 inch overlap, excess wire trimmed, then soldered.
The other connection to Q6 that will help hold it in place is C35, the 47 uF electrolytic capacitor that goes from the Collector to the Ground Buss, with the positive side of the capacitor to the Collector.
NOTICE in the layout drawing that the wire from the Negative side of C35 will pass under the 22k resistor R24 on the Solder Side of the board on its way to the Ground Buss.
Proceed to populate the remainder of the circuit board however you wish. Take your time and double check all connections before applying solder. Correcting wiring errors is sometimes necessary, but it is not much fun.
When the components are all in place, it is time to solder ONE END of the jumpers to the circuit board: Jumper 4 (about 3 1/2 inch of insulated hookup wire) to TP30; Jumper 5 (about2 inches of insulated hookup wire) to TP31; Jumper 6 (about 1 3/4 inch of insulated hookup wire) to TP34.
Strip about 1/4 inch of insulation from each end of the jumper wires, and apply a light coat of solder to the bare wire. If you are using stranded hookup wire, twist the exposed strands tightly together before applying the solder for "tinning".
Be sure the unconnected end ends of the jumpers do not touch the circuit board or any component on the circuit board.

Why connect only one end? (You might want to know.) Because we have not yet done Current & and Voltage Measurements, which will be done in Part 6.
The "other" end of the jumpers will be soldered in place as Measurements are completed in Part 6.
The color of the insulation is, of course, arbitrary. I use red wire to carry 12 volt power; black, green, or gray for Ground; and some other color for signal connections.
INITIAL CHECK-OUT
A Few Words Regarding Testing - - -
Each module will be tested to make sure it is functioning properly before being connected to other modules for operational testing.
A generic test procedure:
[] Visual Check to make sure all the components are present and properly soldered into place.
[] Resistance Check will reveal "short" (Zero Ohms) circuits and "open" (No Continuity) circuits.
[] Current Check to be sure excessive current is not being drawn, or that no current is being drawn in a circuit that should be drawing current.
[] DC Voltage Check to be sure the proper voltages are present at key points in the circuit.
[] AC current and voltage checking for signal processing modules.
[] Operational check to be sure the module if functioning properly.
The most likely cause of problems on a newly built circuit is a WIRING ERROR of one kind or another.
Wiring Errors include:
[] Missing components
[] Components not connected
[] Components connected to the wrong place
[] Connections not soldered
[] “Cold” solder connections
- insulation material, such as enamel, not removed before soldering
- not enough heat applied to flow the solder
- mechanical shock or movement before the solder solidifies
[] Solder “bridges” causing a “short” circuit between two solder joints.
Initial Check-out Includes:
[] Visual Inspection
[] Resistance Measurements
VISUAL INSPECTION
Begin your check-out with a thorough VISUAL INSPECTION to make sure that there are no missing parts, and that components are connected correctly, and properly soldered. Defects will, of course, become obvious during resistance, current and/or voltage checks, but a good visual check can often spot errors that can be quickly and easily corrected before electronic testing begins and, thus, save a lot of time.
Begin your Visual Inspection with a COMPONENT COUNT.
[] On the Component Side of the circuit board, you should find:
[] Three Jumper Wires CONNECTED AT ONLY ONE END. (The unconnected end of the jumpers will be used as test points during Resistance Measurements, below, and during Current & Measurements in Part 6.)
[] Two Transistors, a 2N3904 and a 2N3053. The 2N3053 should have a heat sink attached.
[] Ten 1/4 Watt resistors.
[] Three 0.1 ceramic capacitors.
[] One 1N4148 diode.
[] Three 10 uF electrolytic capacitors.
[] One 47 uF electrolytic capacitor.
[] One 220 uF electrolytic capacitor.
If you find a discrepancy in component count, use the layout diagram and/or the schematic to find the error.
[] On the Solder Side of the circuit board, check to see that all components are correctly connected and properly soldered. I use a magnifying glass for this check because I have found that magnification sometimes shows problems that I would miss with the naked eye. Finding a wiring error or a bad solder joint with a visual check is a heck of a lot easier than tracking it down during resistance, current, or voltage checks.
Correct any errors found during the visual inspection, then proceed to resistance measurements, below.
RESISTANCE MEASUREMENTS . . .
. . . to verify that components are correctly connected and properly soldered in place.
Before doing resistance measurements, set your DMM to its lowest resistance scale, connect the two test leads on your DMM together, them observe and record the value shown on your meter. This is the "Zero" Ohms value for your meter. On meters I have used, it is usually somewhere between 0.0 to 0.5 Ohm.
Some meters have provisions for adjusting so the meter will read zero for a dead short. If your meter has such an adjustment, simply set it to Zero with the test leads connected together, and you are good to go.
Unless specified otherwise, resistance measurements are taken from the POINT INDICATED to the GROUND BUSS.
Resistance values are specified in Ohms; k = X 1,000
Resistance Measurements (other than ZERO and OPEN, which should be CRRECT or NOT CORRECT) are OK if they are within plus or minus 10%. If your measurements are off more than 20%, you probably have one or more wiring error.
[] TP40 to Ground Buss . . . . Zero
NOTE: Now that you have verified that TP40 is connected to the Ground Buss, TP40 can be used as your GROUND POINT for Resistance Measurements.
[] TP26 . . . . . . . . . . . Zero
[] TP27 . . . . . . . . . . . Open, No Continuity
[] TP28 . . . . . . . . . . . Open, No Continuity
[] TP29 . . . . . . . . . . . Zero
[] TP30 . . . . . . . . . . . No Measurement at this time
[] TP31 . . . . . . . . . . . Open, No Continuity
[] TP32 . . . . . . . . . . . Open, No Continuity
[] TP33 . . . . . . . . . . . Open, No Continuity
[] TP34 . . . . . . . . . . . Open, No Continuity
[] TP35 . . . . . . . . . . . Open, No Continuity
[] TP36 . . . . . . . . . . . Zero
[] TP37 . . . . . . . . . . . Open, No Continuity
[] TP39 . . . . . . . . . . . Zero
NOTE: You have probably noticed on the Layout Drawing that TP28, which is the Entry Point into the Audio Amplifier module, does not connect to anything on the circuit board. This may seem rather strange at first glance, but a quick inspection of the Schematic Diagram shows what is going on. Before the signal enters the circuit board it passes through R17, the Audio Gain potentiometer, which will be mounted on the Control Panel of the Transceiver. (More about mounting potentiometers when we get to Building the Control Panel.)
TP28 provides a place to connect the signal wire from the Product Detector to the signal wire going to R17.
R17 will not be connected into the circuit until we get to Operational Testing, but it does no harm to plan ahead.
Continuing with Resistance Measurements . . .
NOTE: The three measurements, immediately below, are between two test points, NOT to Ground.
[] TP30 to TP32 . . . . . . 2.2k
[] TP30 to Q6 Collector . . . . . . Open, No Continuity
[] TP30 to Q6 Base . . . . . . Open, No Continuity
Measurements on transistors, below, are from the leg indicated to Ground.
Q5, 2N3904
[] Emitter . . . . . . . . . . . 220
[] Base . . . . . . . . . . . 8.6k
[] Collector . . . . . . . . Open, No Continuity
Q6, 2N3053
[] Emitter . . . . . . . . . . . 148
[] Base . . . . . . . . . . . Open, No Continuity
[] Collector . . . . . . . . . Open, No Continuity
Correct any errors found during Resistance Measurements before proceeding to Current & Voltage Measurements, and initial Operational Test in Part 6.
NOTE for those brave souls (especially inexperienced builders) who are attempting to build this module: If you have questions, comments, or suggestions, please email - - -
- END of Part 5 -
No comments:
Post a Comment